When a new hire joins a team, there’s a predictable, often tedious sequence of tasks:
- provisioning access to tools (Jira, Confluence, Slack, etc.)
- pointing them to policies, handbooks, guidelines
- scheduling or directing them toward orientation/training
- surfacing the right knowledge (team norms, past decisions)
- answering ad hoc onboarding questions (“Where do I file expenses?” or “Which Slack channel for #devops?”)
If we treat that flow as knowledge work, it fits nicely as a candidate for a domain-specific agent. The Onboarding Buddy Agent becomes a virtual first responder: guiding new hires, surfacing policy, linking to training, and executing or initiating simple onboarding operations (with guardrails). The magic is that Atlassian’s Rovo Studio gives us a way to author such agents in a controlled, extensible way.
In this essay, I walk you through how to build an Onboarding Buddy Agent using Rovo Studio. Along the way I reflect on design trade-offs, pitfalls, and how to ensure it passes muster from an Atlassian/Rovo expert’s viewpoint (permissions, governance, prompt hygiene, knowledge scoping, maintainability).
What is Rovo Studio (and how it fits)
Before jumping into the agent, it’s worth understanding the scaffolding.
- Rovo Studio is Atlassian’s builder environment for agents, automations, assets and “hubs” (intranets/help centers), all in one place.
- Within Studio you can create and configure Rovo Agents (by wizard or manual setup).
- Agents built through Studio are configurable: they operate based on prompts (instructions), can be pointed to knowledge sources (Confluence spaces, linked apps), and optionally provide actions (predefined behaviors) beyond pure chat response.
- Agents can also be embedded into automation rules: when a trigger fires, the agent can be summoned to produce content (via a prompt) whose response can feed into subsequent automation steps.
- More advanced agents (with tight integration or custom logic) may be built via Forge using the
rovo:agentmodule, but starting in Studio is often the right balance of power and safety.
Thus, Rovo Studio is your “authoring sandbox” for this onboarding use case. It lets you iterate and refine behavior, rather than writing full code from day one.
High-level design of the Onboarding Buddy Agent
Before configuring anything, it helps to sketch a blueprint. Below is a conceptual decomposition.
Core responsibilities
- Guidance
Walk the new hire through step-by-step onboarding: e.g. “First, get your Atlassian account; then, connect to Slack; then read our engineering handbook,” etc. - Knowledge lookup
Answer questions about policies, tools, org norms by pulling from Confluence (or other knowledge sources). For example: “What’s the vacation policy?” or “How do I request a GitHub account?” - Action orchestration
For operations that can be automated or initiated (e.g. open a Jira onboarding ticket, assign training modules, send welcome emails), provide controlled “actions” rather than freeform action. - Context awareness & persona
Recognize the new hire’s role/team and adapt suggestions (e.g. backend engineering vs. marketing). Maintain a consistent, helpful tone. - Fallback and escalation
For questions the agent can’t answer, escalate or hand off (e.g. direct to HR, open a ticket, or record unanswered questions for later human review).
Scope & constraints
- Always respect permissions: the agent only surfaces knowledge the user already has access to. It should not bypass Confluence permissions or Jira project restrictions. (Studio agents don’t grant extra access)
- Keep the space of actions limited (don’t try to automate everything on day one). Overly broad actions increase risk.
- Plan iteration: start narrow (e.g. onboarding for engineers) and expand later.
- Guarantee observability: logs, monitoring, feedback to humans when the agent fails or is ambiguous.
- Maintain governance: have a review process for each update (prompt tuning, new knowledge, etc.).
With that in mind, we’ll map this design into a concrete build in Rovo Studio.
Step-by-step: Building the Onboarding Buddy in Rovo Studio
1. Prepare your knowledge sources
Your agent is only as good as what it can reference. Do the following groundwork:
- Consolidate onboarding documentation in one or more Confluence spaces (e.g. Company Onboarding, Engineering Handbook, HR Policies). Ensure permissions are well-set.
- Create a curated space or page index (or an “Onboarding Table of Contents”) to act as an entry point.
- If there are external tools (Google Docs, intranet wiki, etc.), ensure they’re connected via Atlassian’s connectors (if supported) so Rovo can index them.
- For dynamic data (e.g. training schedules, tool lists), consider maintaining a structured Confluence page or a controlled data source that the agent can query (rather than letting the model hallucinate).
Once the knowledge consolidation is in place, you can safely connect them to the agent.
2. Create the agent in Studio
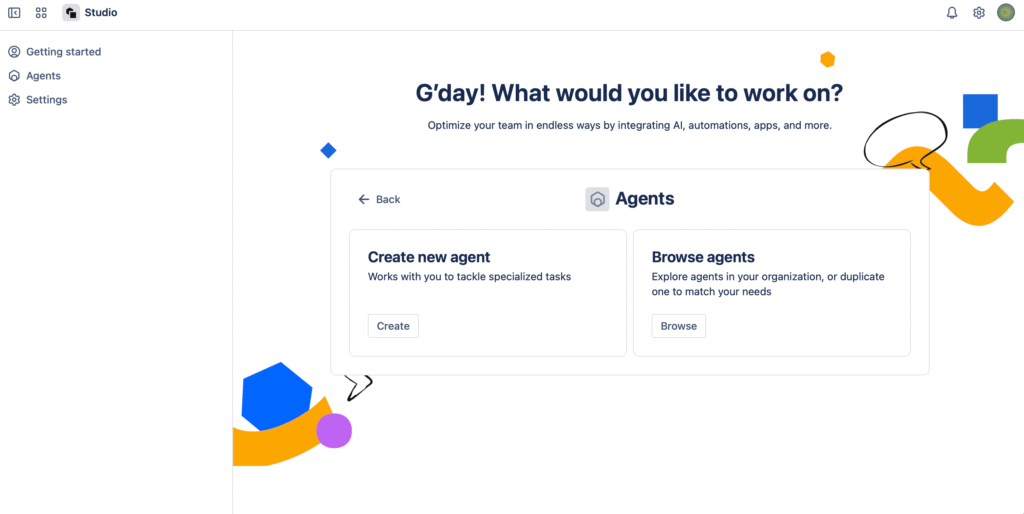
- In Atlassian, open Studio (via app switcher).
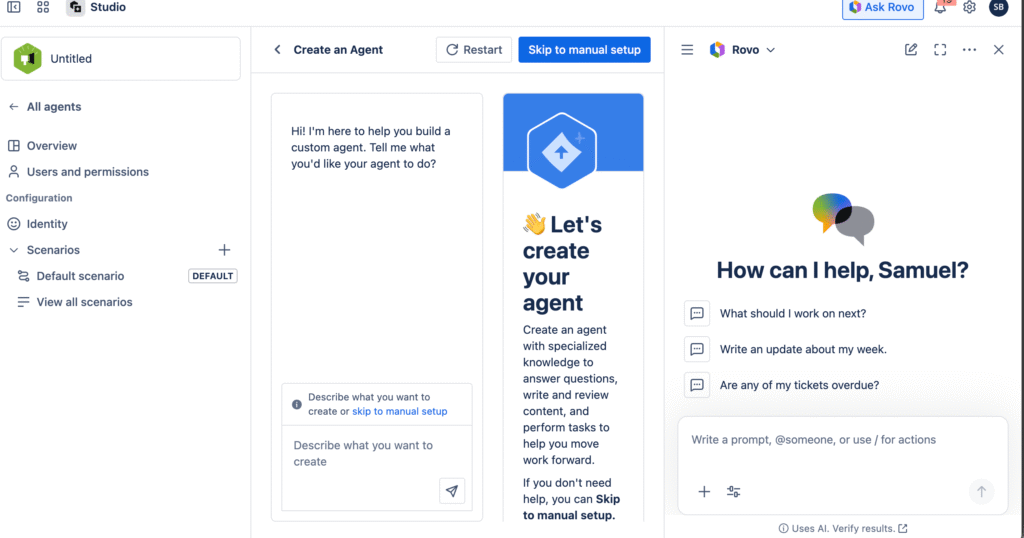
- Navigate to Agents → Create → choose “Skip to manual setup” (so you have more control).
- Enter:
- Name: e.g.
Onboarding Buddy - Description: “Guides new hires through getting access, policy orientation, and training paths”
- Behavior prompt: a base instruction that always holds (we’ll refine it next)
- Conversation starters: e.g. “How do I access my tools?” or “What’s next in onboarding?”
- Name: e.g.
You now have a skeleton agent ready to be enriched.
3. Define the default scenario (prompt, knowledge, actions)
Prompt / instructions
The prompt is critical — it defines the agent’s “personality,” constraints, and how it reasons. A draft might look like:
You are Onboarding Buddy, a helpful assistant for new hires.
Your mission: walk a new hire through initial steps (tool access, reading policies, scheduling training), answer onboarding-related questions, and initiate permitted actions only when explicitly authorized.When you receive a message:
- Interpret the user’s role and stage (if possible).
- Check your knowledge sources (Confluence) for relevant information.
- If answerable, respond concisely with links or steps (≤ 100 words).
- If an action is available and the user explicitly requests it (e.g. “create my onboarding ticket”), offer the action as a choice.
- If uncertain or no knowledge match, hand off to HR or create a “pending question” record.
Refine it over time based on usage.
Knowledge sources
In the Studio agent settings:
- Link the appropriate Confluence space(s) (Onboarding + Policy + Team spaces).
- Optionally restrict to “Only reference these sources” so the agent doesn’t wander into general web content.
- You may also include “starter pages” (index pages) or excluded pages to refine context. (This is similar to how Atlassian documentation allows limiting sources)
Actions
Define a small set of safe, deterministic actions. Examples:
- Open Onboarding Jira Ticket — creates a ticket in a predefined onboarding project with a template.
- Assign Training Module — triggers assignment of a training module (via integration or email).
- Send Welcome Email — drafts or triggers an email (with a template) to the new hire.
- Raise Help Request — open a ticket to HR or IT for unsupported questions.
Be careful: each action must respect permission boundaries and require user confirmation before execution. Start with just one or two actions (e.g. ticket creation) and expand later.
4. Test, iterate, validate
- Use “preview” mode or direct chat within Studio to test sample queries (e.g. “Where do I get Slack access?”).
- Capture failure cases (where the agent gives a bad answer or no answer) and add those as negative examples or “fallback” rules.
- Tune prompts, especially the guard rails (“you should not answer policy questions outside your domain,” etc.).
- Use instrumentation: logs of agent usage, tracking which queries failed or led to handovers.
- Involve HR / people ops / onboarding stakeholders in reviewing answers (so the agent’s responses align with correct policy).
5. Deploy and embed
Once tested, activate the agent. Then integrate its presence into your user flows:
- Expose the agent via Chat in Jira/Confluence so a new user can invoke it contextually.
- Use
/aiprompts in Confluence or Jira pages to allow inline queries. - If certain onboarding events occur (e.g. a “new user created” event), you could trigger an automation rule that messages the user (or assigns the agent) to proactively begin the conversation.
- Optionally embed via automation: on a new user account creation trigger, have an automation rule call the agent (using a prompt like “Welcome new hire — propose next steps”) and send the result to the user. (Agents can be called in automation rules, though in that context they provide a textual response, not full actions)
6. Governance, evolution and scaling
- Regularly review logs of “agent failures” (unanswered queries) and feed them back into prompt updates or knowledge authoring.
- Version your prompt and actions; for each new iteration, test in a staging environment.
- Use role-based control (coming soon in Rovo) to limit who can create or alter agents.
- Duplicate the agent for different roles (engineering, sales, HR) by copying the base and adjusting knowledge + flows.
- As patterns emerge, refine the agent’s internal branching (scenarios) so it knows, for example, “if user says ‘I’m an engineer’ then follow engineering onboarding path.”
Example conversation flow (sketch)
Here’s a hypothetical exchange that illustrates how the agent might behave:
User: Hi — I just joined the backend team, what do I do first?

Agent: Welcome aboard! To start, here’s a checklist for backend engineers:
1. Request access to Jira + Bitbucket: [link]
2. Read the **Backend Onboarding Guide**: [Confluence link]
3. Join #backend-team Slack
4. Complete “Our Engineering Practices” training

Would you like me to open a Jira Onboarding ticket for you to track these steps? [Yes / No]

User: Yes, please.

Agent: Done—ticket **ONB-123** created in the Onboarding project. I’ll remind you of next steps. Anything else I can help with?

User: Where’s our holiday leave policy?

Agent: You can find our leave policy in the **HR Policies** Confluence space: [link]. In short: engineers get 20 days paid leave per year, plus 5 sick days.
(Is there anything else you’d like to know about benefits or time off?)

User: Awesome, thanks.
If the user asks something outside scope (e.g. “Who do I report to?”), the agent can respond:
I’m not sure who your direct manager is. Would you like me to raise a query to HR on your behalf?
Design cautions and pitfalls (what Atlassian experts will watch)
When you aim for production quality and want Atlassian Rovo experts to validate your agent, pay attention to:
- Prompt drift & hallucination
The agent must stay within its knowledge bounds. Never allow it to fabricate policies or invent steps. Use explicit prompt guardrails to reject queries outside scope. - Permission boundaries
The agent must respect Confluence/Jira permissions: do not expose content a user cannot see. Agents built via Studio operate under the user’s permission context. - Action safety
Each action should require explicit user confirmation, and ideally in a preview mode. Do not permit “silent” destructive actions. Logging and audit trails of all actions is critical. - Failover strategy
Some queries will always be unpredictable. Provide fallback: escalate to human, log for review, or respond that you can’t answer. - Scope creep
Don’t try to bake in every HR, legal, IT operation at the start. Begin with onboarding for one role or team, then expand. - Governance & review cycles
Prompt updates, knowledge additions, and action definitions should go through a stakeholder review (e.g. HR, IT). Allow rollback. Maintain versioning. - Monitoring & metrics
Track metrics such as:- “unanswered queries” rate
- feedback from users (“this answer was helpful”)
- number and success/failure of actions
- maintenance burden (how often does the prompt need tweaking)
- Scalability & performance
If many users call the agent simultaneously, watch usage quotas, rate limits, and response latency. Keep knowledge sources trimmed and high-quality.
When to consider the Forge (custom) route
As your needs grow, you might hit the limits of Studio. For example:
- You need custom logic beyond simple actions — e.g. complex branching, external APIs, or deep integrations.
- You want more control over request routing or stateful sessions.
- You need centralized data access across multiple Atlassian sites.
In that case, you can build a Forge app using the rovo:agent module. You’ll author a manifest.yml, define prompts and actions, write handler code for actions, manage resource permissions, etc. However, even when taking that path, your core design (knowledge + prompt + fallback) remains the same.
Closing
Building an onboarding agent is a compelling early use case for Rovo, because the domain is well-bounded, repeatable, and high value to new employees. Starting in Rovo Studio gives you a safe, iterative path to a working agent without large upfront engineering costs. Over time, with usage feedback and governance, you can evolve it, split by role, or port parts into a Forge-based implementation if needed.
Stay Clouding!